Automated version control
Overview
| Questions | Objectives |
|---|---|
| What is version control and why should I use it? | Understand the benefits of an automated version control system. |
| Understand the basics of how automated version control systems work | |
| How do I record changes in Git? | Understand the modify-add-commit cycle |
| How do I check the status of my code version? | Explain where information is stored at each stage of that cycle. |
| How can I recover old versions of files? | Walk through the git history, understand the use of commit hashes |
Why do we need to keep track of versions?
Problem: If you have to identify and find your code from 17 days ago, can you?
Version control is an answer to the following questions (do you recognise some of them?):
- “It broke … hopefully I have a working version somewhere?”
- “Can you please send me the latest version?”
- “Where is the latest version?”
- “Which version are you using?”
- “Which version have the authors used in the paper I am trying to reproduce?”
- “Found a bug! Since when was it there?”
- “I am sure it used to work. When did it change?”
- “My laptop is gone. Is my thesis now gone?”
Popular automated version control systems
Git is the by far most used version control system. Platforms using Git are Codeberg, GitHub, GitLab and BitBucket. All three platforms use the same Git commands, i.e. you will be able to work in the same way with code on your laptop independent from which platform you choose. However the web interfaces of those three platforms look differently and might also offer different functionality.
This tutorial uses GitHub.
Browse an existing project
In this chapter, we will look at an existing repository to understand how all the pieces work together.
- See a real Git repository and understand what is inside of it.
- Understand how version control allows advanced inspection of a repository.
- See how Git allows multiple people to collaborate relatively easily.
- See the big picture instead of remembering a bunch of commands.
Go to the git repository Recipe book.
Basic Browsing
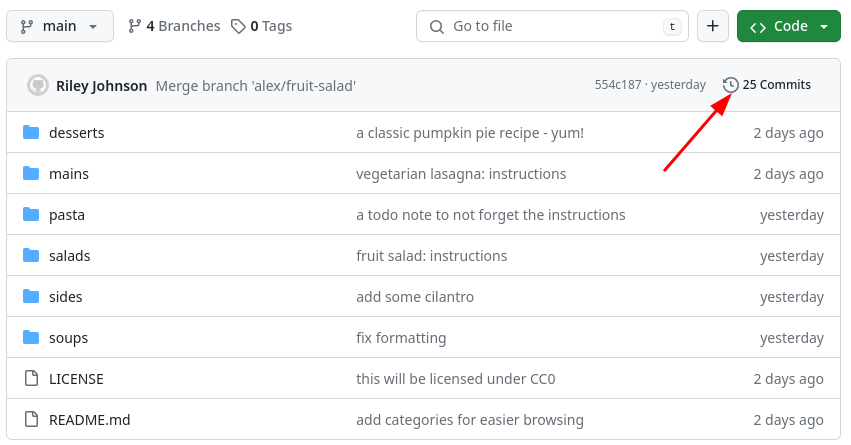
The most basic thing to look at is the history of commits.
- This is visible from a button in the repository view. We see every change, when, and who has committed.
- Every change has a unique identifier, such as 554c187. This can be used to identify both this change, and the whole project’s version as of that change.
- Clicking on a change in the view shows more.
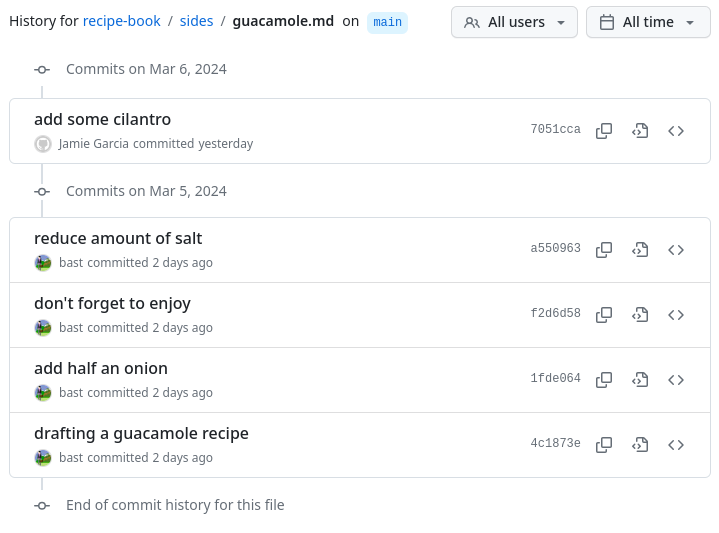
We can also have a look at the history of a single file, so we know when the file was changed last and by whom. Click on a file and then on the history.
Exercises
Explore the Web interface!
- How many changes did the Guacamole recipe receive?
- Which recipes include the ingredient “salt”?
Version control makes it very easy to find all occurrences of a single word. This is useful for things like finding where functions or variables are defined or used.
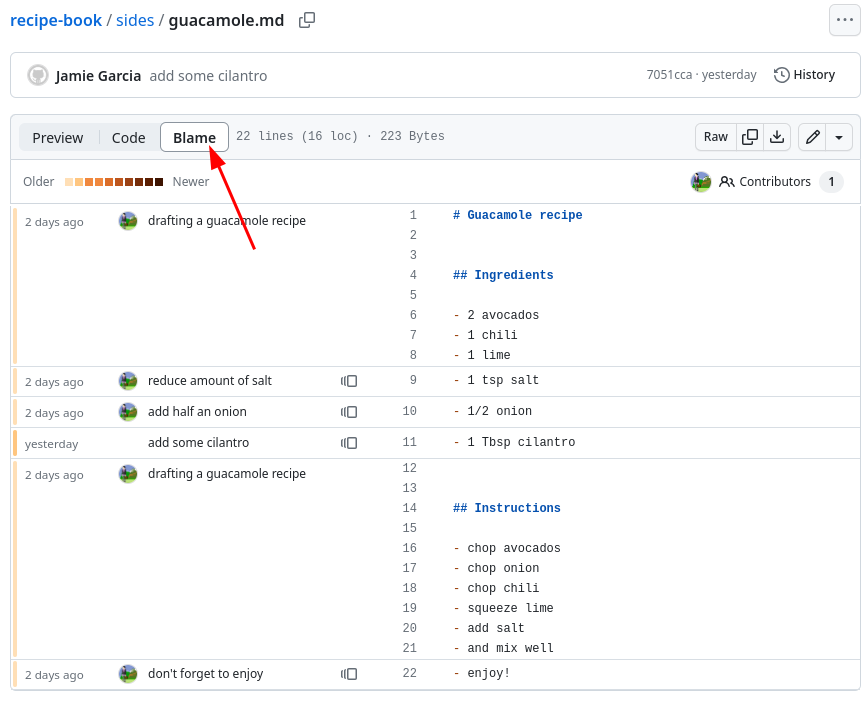
Who modified each line last and when?
This is called the “annotate” or “blame” view. The name “blame” is very unfortunate, but it is the standard term for historical reasons for this functionality and it is not meant to blame anyone.
Are you allowed to use these recipes yourself? Are you allowed to publish modifications to these recipes?
- Look at the file LICENSE.
- It says it is “Creative Commons Zero 1.0”, which is equivalent to public domain. You can use them without conditions.
- Note the GitHub view of the file LICENSE gives a nice summary of what it means. Try it out:
Browse issues and pull requests in the repository
This can only be done through the GitHub view. Issues and Pull requests are different for each GitHub copy.
Click on the “Issues” tab. These are notes that people have added, which allow discussion about the project. Often they are used to communicate problems or ideas.
Click on the “Pull requests” tab. This allows anyone to propose changes, but only the repository owners can accept.
Summary
- Git allowed us to understand the development of this simple project much better than we could, if it was just a few files on our own computer.
- It was easy for us to access the project (hence easy to share our work with others).
In the next section we will create our own Git repository!
Creating a Code repository
- Create an own GitHub repository from a template
- The purpose of templates
- Edit and adjust your repository through the GitHub web interface
Forking versus creating
Git knows two ways of creating an own Git repository.
If you like to have a copy of an existing Git repository that someone else created, you create an own copy by “forking” the repository. This will create a copy of the repository under your GitHub account.
You can create your own GitHub code repository. Simply go to your account and click on the green button “New” under “Your Repositories”
Simple repository templates provided by Utrecht University
In this course you will create a new GitHub repository for your code using a template. By using our Utrecht University template you will already fill the repository with a file-folder structure, a license and a draft README file.
Python developers please go to the simple python template repository.
R developers please use the simple R project repository.
- Click on the green button “Use this template” and “Create a new repository”.
- Now you can select an owner, most probably your account on GitHub and you can give the new repository an own name. You can also add a description which will show up on the repository’s webpage.
- You will need to decide whether the repository will be publicly visible or only for you. Since later in the course we will have a look at each others repositories and give feedback please choose “public”.
- Click on “Create repository”. The repository will now be created and be shown.
With the template you created a repository where code (src or R), data and documentation are nicely separated.
Adjusting the new repository through the web interface
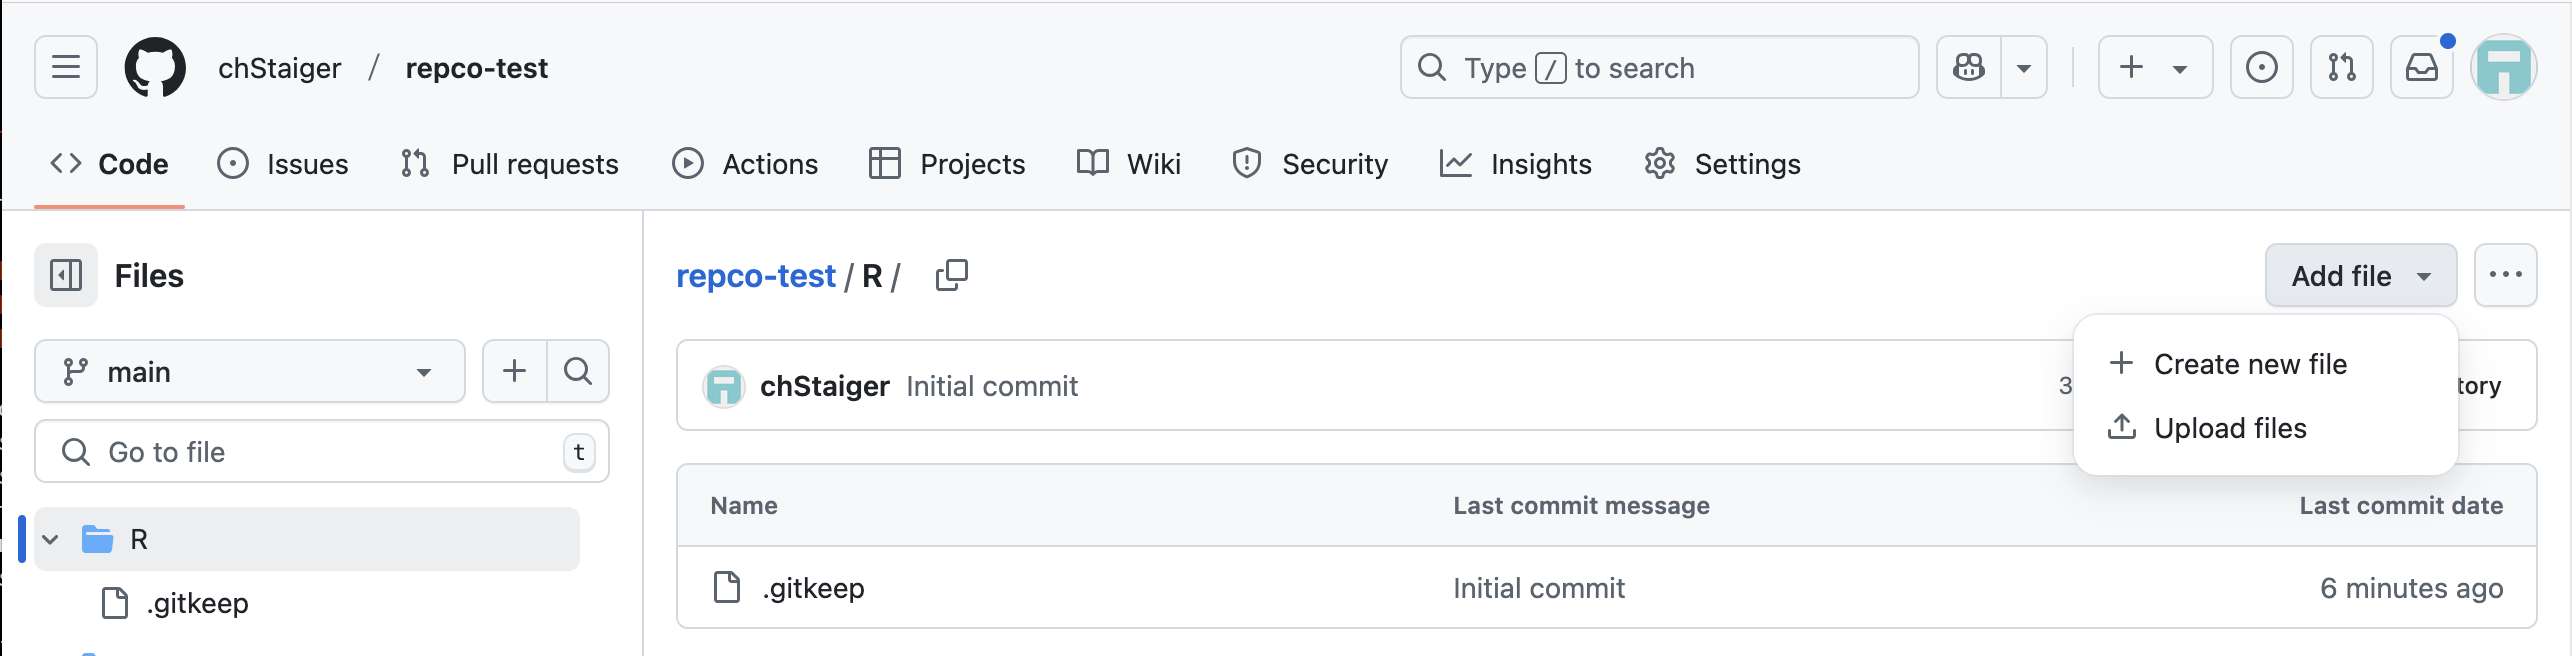
You can now start and add your script or code from your computer to the repository:
Navigate to the respective folder where you would like to place the file(s)
Click on “Add file” and then choose whether you want to “upload” a file from your computer, or if you would like to “create a new” file and edit the text in the web browser.
In case you upload files add a Commit title and text, or in the case of editing a file click on “Commit changes” and add a title and description.
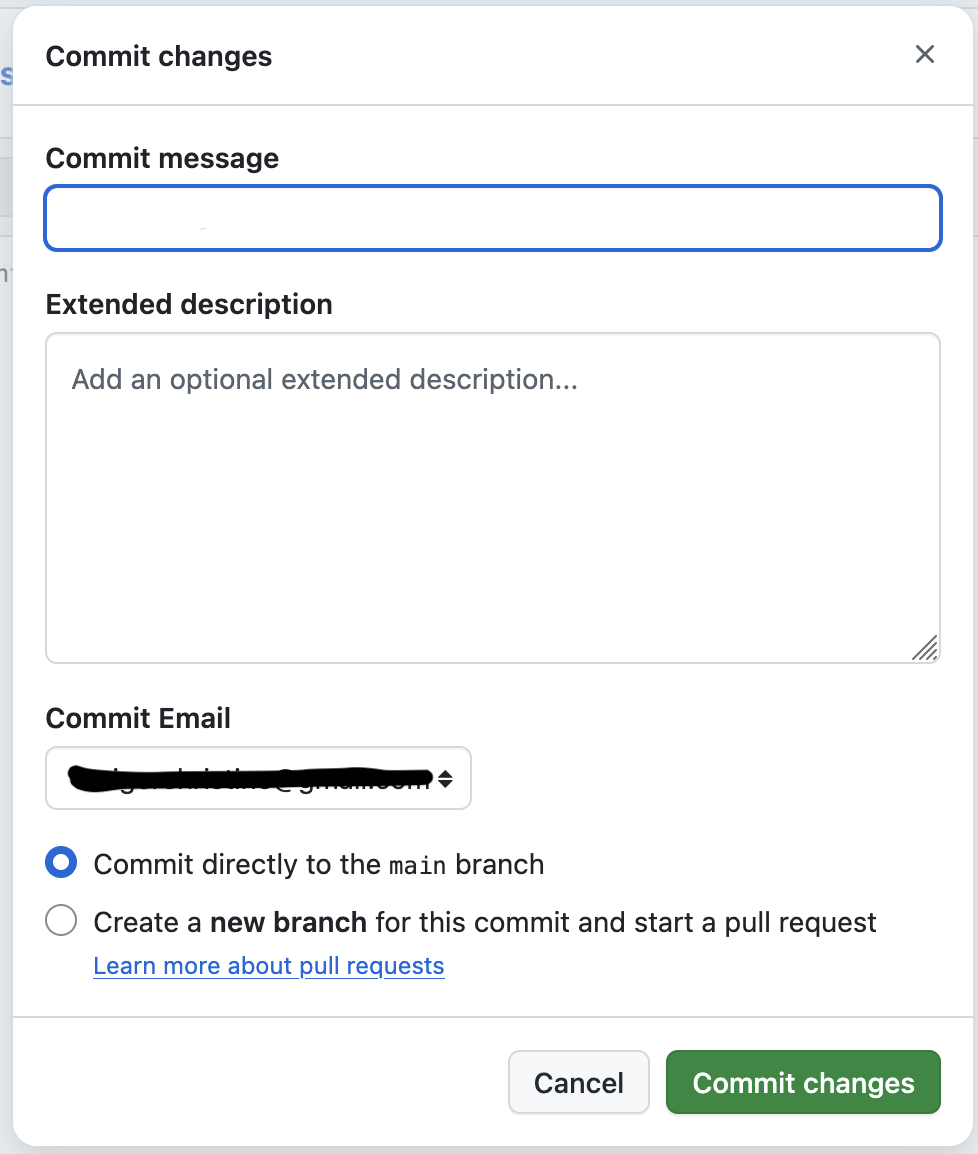
- Adjust the README.md file. Go back to the top level of your repository and click on the README file and then click on the pencil in the grey row above the text.
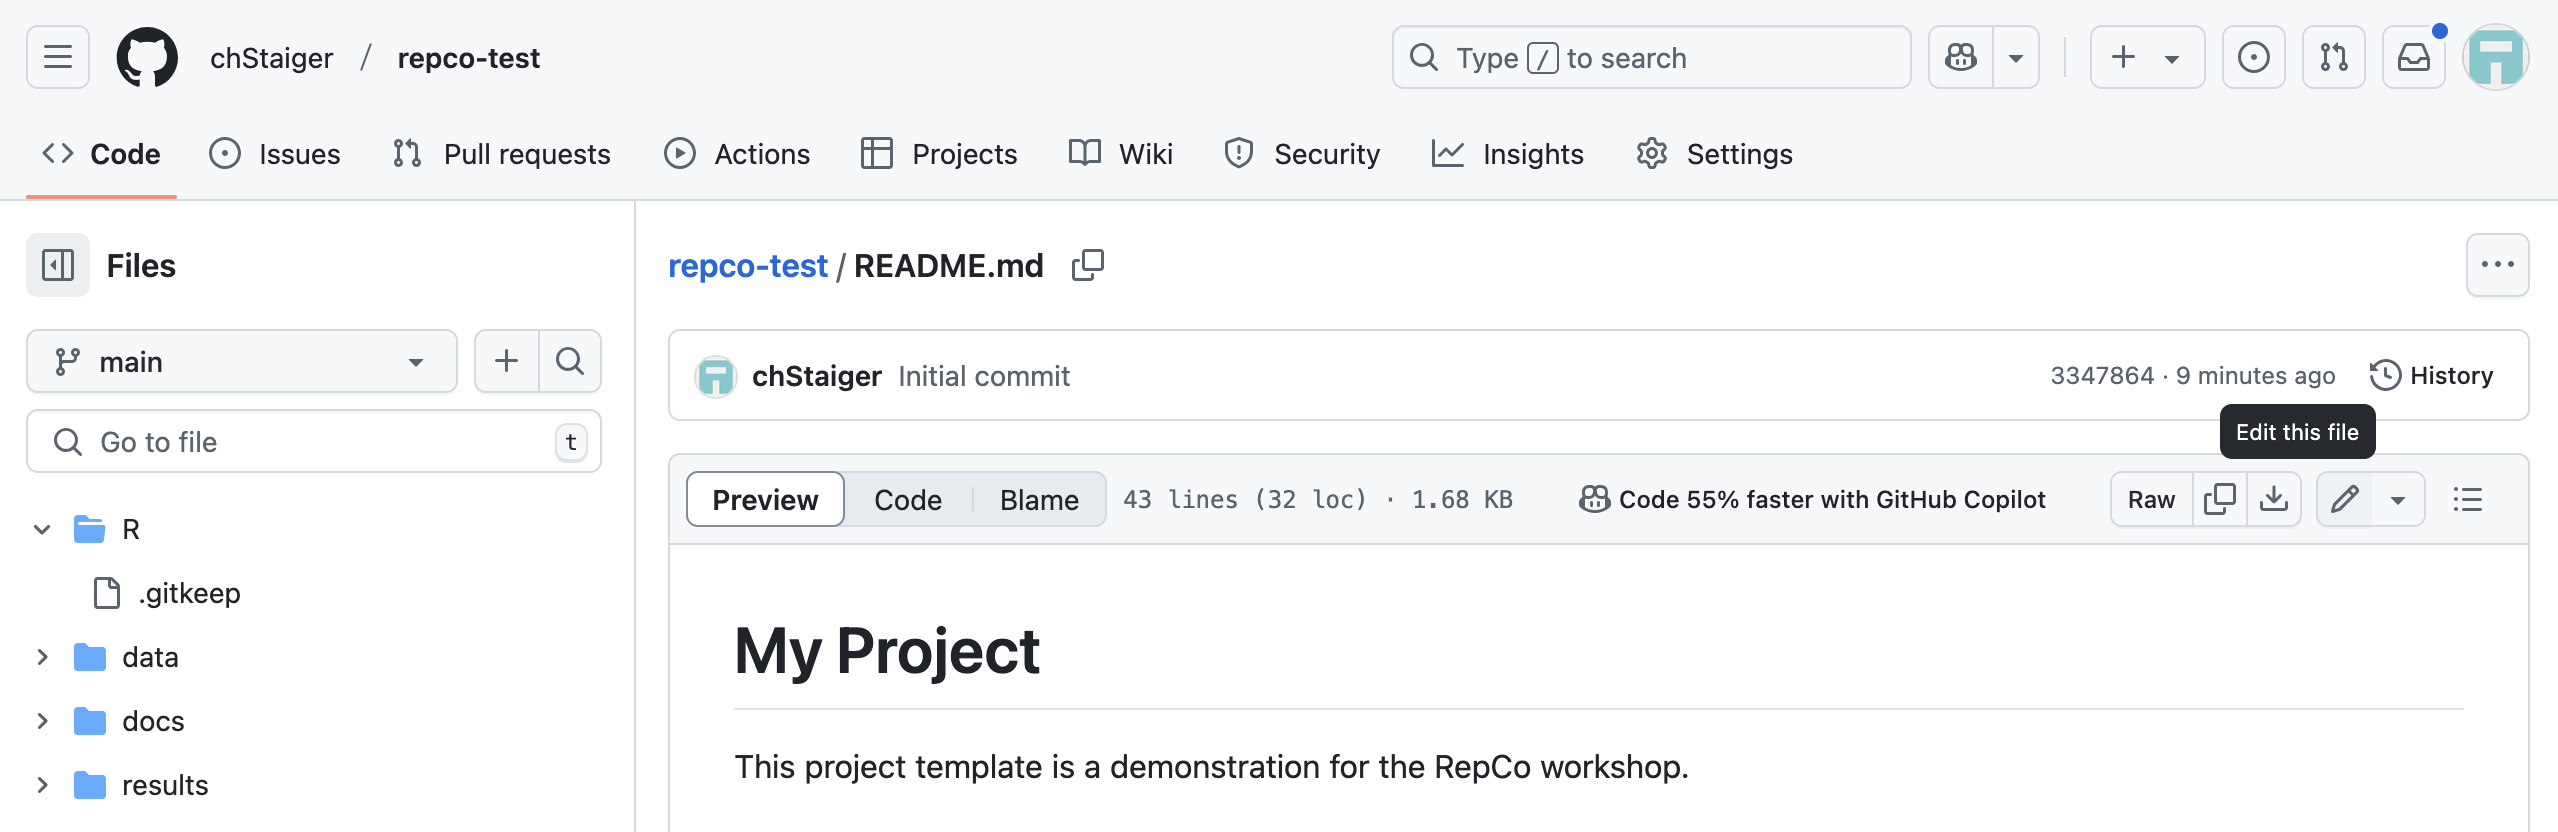 This opens and editor in “edit” mode. Adjust the README a bit (we will also do some changes later). With the “Preview” button (next to “Edit”) you can see how the file will be rendered. MarkDown files are an easy way to create documentation. If you are not yet familiar with MarkDown please have a look at one of the many MarkDown Guides.
A word on “Commits” As we saw in the previous section the commit titles are shown in the history of the repository. The title and the message will help us later to understand what we updated and why we updated the code base.
Now that you have started to customise your new GitHub repository, let’s have a look whether we can do that in a bit more convenient way, directly on your computer instead of through the web browser.
Working with your repository on your laptop
- Understand the difference between a local and a remote repository
- The pull - commit - push workflow

When you create a repository on GitHub, it exists as a remote repository. This repository contains all files, but also information on commits, history and concepts that we have not discussed yet like branches and tags.
With cloning your remote GitHub repository you create a copy of all that on your computer. This we call a local repository. On your local repository you can change and add files without changing the remote GitHub repository. So this allows you to play around with your code and in case you messed up you can set the state of your code back to the remote repository.
Clone your repository
Let’s create a local clone (copy) of our remote GitHub repository. Click on the name of your repository to go back to the top level. You will see a green button “Code”, click on the button, choose the “SSH” and use the copy icon to copy the url in the field. 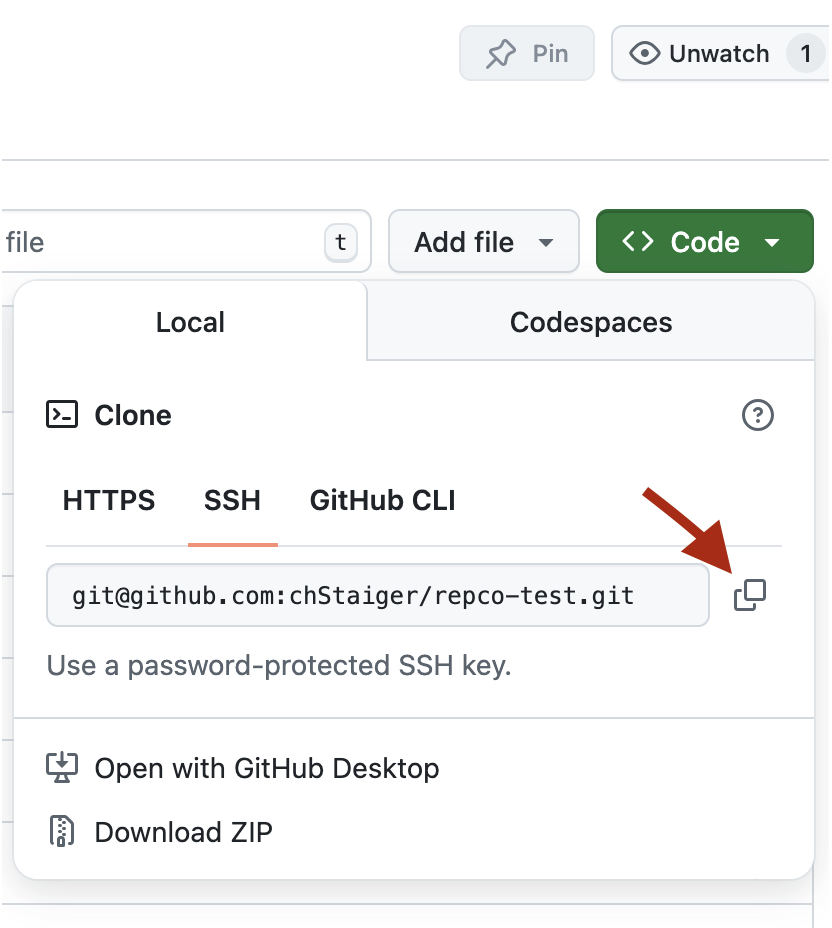
Open your git bash or terminal, navigate to the folder in which you would like to create the folder for your repository (e.g. cd git_repos) and do:
git clone <paste the url here>Now you can cd into you local repository and start working.
Update the remote GitHub repository

Let us open the README file again. You can do by opening a commandline editor like nano or vim (Mac, linux) or you can go to your file browser and open the README file with e.g. Notepad.
Change something in your README file, e.g. add an extra sentence to the description, save it and go back to your git bash or terminal.
Let us check how git detects changes between the local and remote repository, type in:
git statusYou will see that git detected that the README changed. How can we now update the remote GitHub repository with our local changes?
We first have to “add” the changed files:
git add <path shown in the status>and observe the change of the status:
git statusFrom the web interface we know, that all changes come with a commit message. Let’s add it:
git commit -m "<Replace with your message>"
git status
Now you will see in the status message that there is one commit on your computer waiting to be send (“push”) to the remote GitHub repository.
git pushGo to the browser and inspect the history and the new changes in your remote repository.
Update the local repository
Assume you changed your remote repository through the browser, how do you update your local repository?
Make another change to your README file in the web browser of GitHub and commit the change. Now go back to your terminal and do:
git status
git pull
Voilá, the changes from the remote GitHub repository are now in your local repository.
The .gitignore file
With the command “add” you have to specify folders or files to add to a commit. Everything that is not added explicitly will be ignored in the commit and “push”.
In some cases we never ever want to add certain files to the GitHub repository, although we need them or they are created automatically locally. Think of Mac’s infamous “.DS_store” files or resulting data from your workflow that you do not need to upload to GitHub since the code creates them.
To always ignore certain files we have the “.gitignore” file. Your repository contains an example. Please inspect it in you local repository. When you are working on Mac please also add
# mac specific files
.DS_Store
You do not need to upload this file to the remote repository. the “.gitignore” file works on your local repository. However, if you are working together with people on your code, it is wise to add the file to the remote repository since then all of your users will respect, that certain files should not be uploaded.
Summary
- We went through the power of the GitHub web interface to setup a project.
- We saw the use of employing templates to get our initial file folder structure and some essential default files.
- We introduced the concept of a local repository and a remote repository and how to update files between the two.
Exercise
Move some files from on of your projects into your local repository on your computer, run
git statusto see what Git thinks has changed.Are there (temporary) files you do not wish to track? Add them to the
.gitignorefile. If the file is not already there in your repository, create an empty text file and name it.gitignore. Start with a.gitignoretemplate for your language and copy the contents to your new file: examples on this github repo. Then add the name of one of your files to the.gitignorefile. Rungit statusagain.Add the files that you want to save in your new snapshot using
git addandgit commitRun
git logto see the history of your project.Can you use Git and push to Github from your IDE (e.g. Visual Studio Code, RStudio)? Try it!
Experiment with editing and committing on GitHub itself (e.g. add something to the README file). You can then ‘download’ your changes to your local repository using
git pull.Run
git logagain to see the history of your project.Optional: What happens if you edit the same file online and locally, and try to push/pull? (Hint: this often causes a ‘merge conflict’, which is no fun to experience. Going through it today means we can assist you if necessary!)
Advanced material
Presenter slides
References
CodeRefinery, Introduction to version control with Git