Pre-installing Python, R and Julia packages on workspaces
Overview
Certain SURF Research Cloud workspaces allow you to automatically install project dependencies by filling out the URL or DOI of your project during workspace creation.
Key features:
- Automatically clones projects from GitHub, GitLab, Zenodo, Dataverse, or DOI links
- Installs dependencies in separate environments (one per project)
- Supports Python, R, Julia, and Conda projects
- Creates a Jupyter kernel when installation succeeds
Workspaces
- VRE lab
- VRE lab GPU
How It Works
1. Enabling During Workspace Creation
Step 1: Select Custom Packages UU
During workspace creation, select the “Custom Packages UU” option under the Optional Components section. Also select Python tools when creating a worksapce with Custom Packages UU.
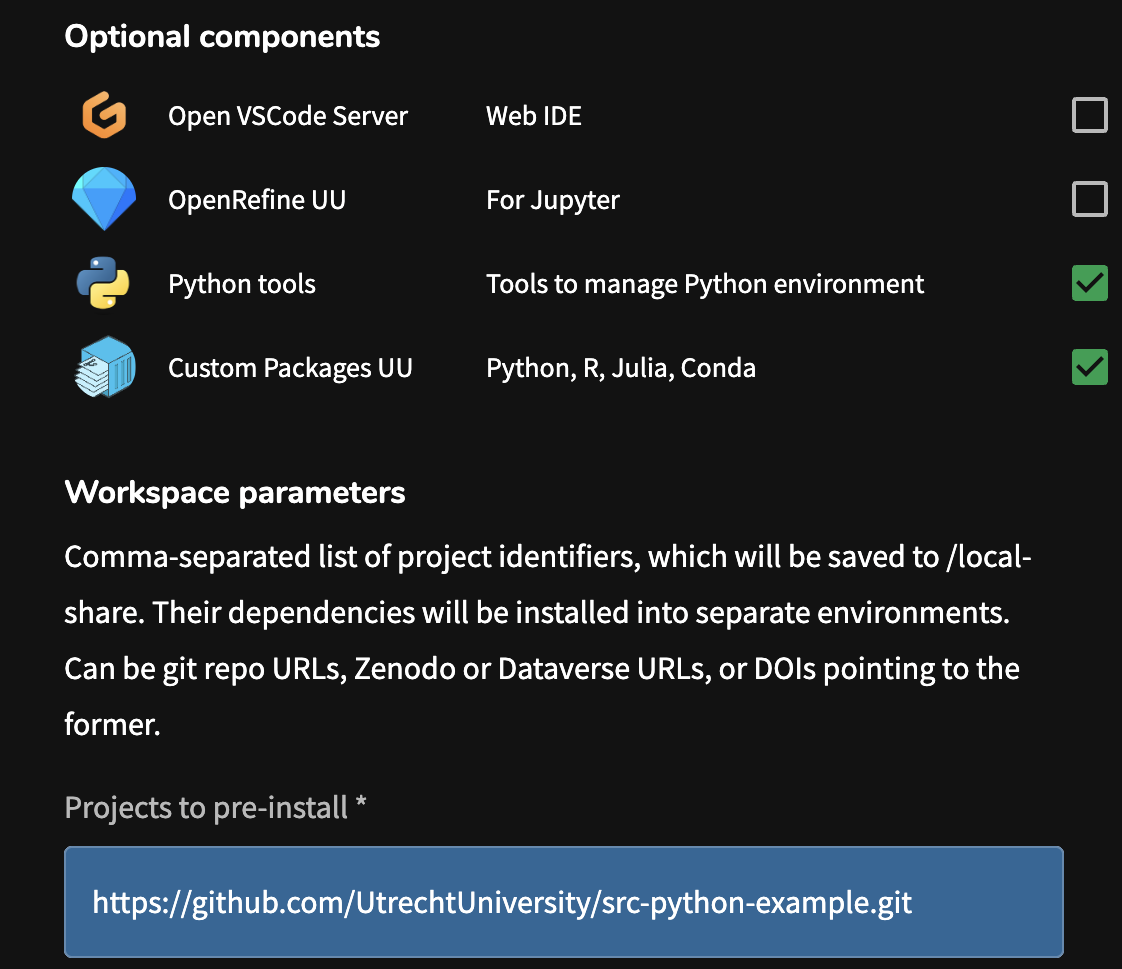
Step 2: Provide Project Identifiers
In the “Projects to pre-install” field, enter a comma-separated list of project identifiers.
Accepted formats: GitHub URLs, GitLab URLs, Zenodo URLs, Dataverse URLs, DOIs (must point to a repository)
You can test with setting up python environments using the src-python-example repository. Copy this URL (https://github.com/UtrechtUniversity/src-python-example.git) into the “Projects to pre-install” field and proceed to create your workspace.
Step 3: Continue Workspace Creation
Continue with workspace creation as normal. The build process may take longer as it installs dependencies, but your environment will be ready when the workspace starts.
2. After Workspace Creation
First Terminal Login
When you open a terminal for the first time after workspace creation, you may see messages like:
Running install scripts at first login: executing /home/username/..._conda.shThis is normal. The workspace is running first-time setup scripts, including initializing conda (if applicable). Wait for these scripts to complete before running commands. Subsequent terminal sessions will not run these scripts again and start immediately.
Finding Your Projects and Environments
Projects Location
Projects are located in:
~/local-share/projects/Each project is in its own directory:
~/local-share/projects/{project-name}/Please note that the local-share folder is not located on a persistent storage volume, which means data in this folder will be deleted when the workspace is deleted. Make sure to push changes to GitHub regularly, or move any files to a persistent storage volume if you want to keep them.
Location: /usr/local/uu/env/conda/{project-name}
To see what’s available:
# List conda environments
conda env list
Location: /usr/local/uu/env/python/{project-name}
To see what’s available:
# List Python/uv environments
ls /usr/local/uu/env/python/
3. Using Your Environments
Activating an Environment
The activation command differs based on the environment type:
# Activate
conda activate /usr/local/uu/env/conda/{project-name}

# Example (for environment.yml in [`src-python-example repository`](https://github.com/UtrechtUniversity/src-python-example.git))
conda activate /usr/local/uu/env/conda/src-python-example

# Deactivate
conda deactivate
# Activate
source /usr/local/uu/env/python/{project-name}/bin/activate
# Example (for [`src-python-example repository`](https://github.com/UtrechtUniversity/src-python-example.git))
source /usr/local/uu/env/python/src-python-example/bin/activate
# Deactivate
deactivateOnce activated, you can run Python scripts using the environment’s packages, install additional packages and work with the project files.
4. Using Environments in Jupyter Notebooks
If the kernel was created automatically, select it from the kernel dropdown in the JupyterLab interface (top right).
Manual Kernel creation
If the kernel wasn’t created automatically (due to dependency installation issues), you can create it manually using the terminal:
# Activate your environment
conda activate /usr/local/uu/env/conda/{project-name}

# Register as Jupyter kernel
python -m ipykernel install --user --name {project-name} --display-name "Python ({project-name})"

# Verify registration
jupyter kernelspec list
# Activate your environment
source /usr/local/uu/env/python/{project-name}/bin/activate
# Register as Jupyter kernel
python -m ipykernel install --user --name {project-name} --display-name "Python ({project-name})"
# Verify registration
jupyter kernelspec listAfter this, refresh your JupyterLab page and the kernel should appear in the kernel selector.
5. Installing Additional Packages
You can install more packages into your environment after creation.
If you are installing new packages, update your Jupyter kernel so your notebooks can access them either by manually re-registering the kernel (see above) or refreshing the JupyterLab page.
# Activate environment
conda activate /usr/local/uu/env/conda/{project-name}

# Install packages
conda install package-name

# Or use pip
pip install package-nameWhen using both conda and pip in a conda environment, install conda packages first, then pip packages. This helps avoid dependency conflicts.
# Activate environment
source /usr/local/uu/env/python/{project-name}/bin/activate

# Install packages with pip
pip install package-name
6. How Dependencies Are Resolved
Dependency files in your project repository are automatically detected and the appropriate environment manager will be selected:
Priority order:
environment.yml: Creates conda environment at/usr/local/uu/env/conda/{name}pyproject.tomlorrequirements.txt: Creates Python/uv environment at/usr/local/uu/env/python/{name}uv.lock: Uses uv with lockfile
renv.lock: R environment lock fileDESCRIPTION: R package description file
Project.toml: Julia project file
environment.yml: Conda environment specification
If a project has environment.yml, it will use conda regardless of other files present. If no environment.yml but has pyproject.toml or requirements.txt, it will use Python/uv.
7. Checking Installation Logs
If something went wrong during installation, you can check the logs:
cd ~/local-share/projects/{project-name}/
cat repo2kernel.log
This log file shows:
- Which dependency files were detected
- What commands were run
- Whether conda or uv was used
- Any errors that occurred
Troubleshooting
Environment exists but doesn’t appear in Jupyter kernel list. Then you can register the kernel manually see Manual Kernel Registration above.
Log shows errors during package installation. Then you can:
- Check
repo2kernel.logfor specific errors - Activate the environment manually
- Try installing failed packages individually:
conda activate /usr/local/uu/env/conda/{project-name}
conda install failed-package-name
source /usr/local/uu/env/python/{project-name}/bin/activate
pip install failed-package-nameconda activate command doesn’t work. Then you can:
Initialize conda in your shell:
conda init bash
# Then close and reopen your terminal
Try the full path:
conda activate /usr/local/uu/env/conda/{project-name}Not sure if your project created a conda or Python/uv environment, then:
Check both locations:
# Check conda
conda env list

# Check Python/uv
ls /usr/local/uu/env/python/

# Check the log
cat ~/local-share/projects/{project-name}/repo2kernel.log
The log shows which commands were run (conda or uv).
Tips
To learn more about dependencies, virtual environments, git and GitHub, consider following the Best Practices for Writing Reproducible code workshop