Installation & Setup
Overview
The course materials are designed to be run on a personal computer. All of the software and data used are freely available online, and instructions on how to obtain them are provided below.
If you have any questions, or are not comfortable with doing the installation yourself join the RDM walk-in hours to ask for help.
Step 1: Install Python
In this course, we will be using Python 3 with some of its most popular scientific libraries. Although one can install a plain-vanilla Python and all required libraries by hand, we recommend installing Anaconda, a Python distribution that comes with everything we need for the lesson. Detailed installation instructions can be found in the Anaconda documentation, or by following the instructions below.
Regardless of how you choose to install it, please make sure you install Python version 3.x (e.g., 3.9 is fine).
We will teach Python using the Jupyter Notebook, a programming environment that runs in a web browser (Jupyter Notebook will be installed by Anaconda). For this to work you will need a reasonably up-to-date browser. The current versions of the Chrome, Safari and Firefox browsers are all supported (some older browsers, including Internet Explorer version 9 and below, are not).
To download the software from the webpage please click on “skip Registration” and then choose one of the Distribution installers.
- Download the Anaconda distribution from the Anaconda website. The website should automatically determine which installation is most suitable for your machine. Save the
.exefile in a location that you can access. - Double click the Anaconda
.executable file to start the installation set-up. - Follow the steps in the set-up:
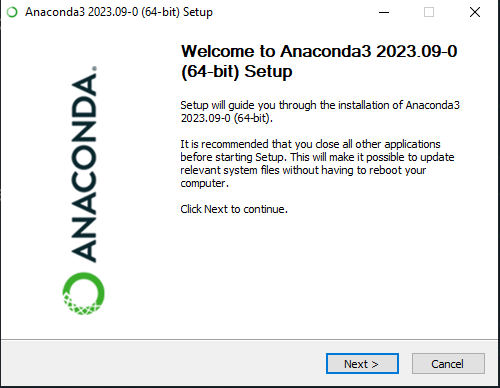
- Welcome to Anaconda: click next
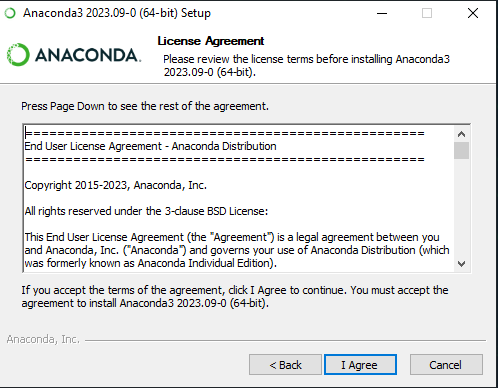
- Accept the License Agreement:
- Select the installation type:
Just MeorAll Users. TheAll Usersoption requires Admin access to your computer. If you do not have such rights, chooseJust Me. Otherwise, we recommend choosingAll Users. If you install Anaconda for all users, click Yes to the question “Do you want to allow this app to make changes to your device?”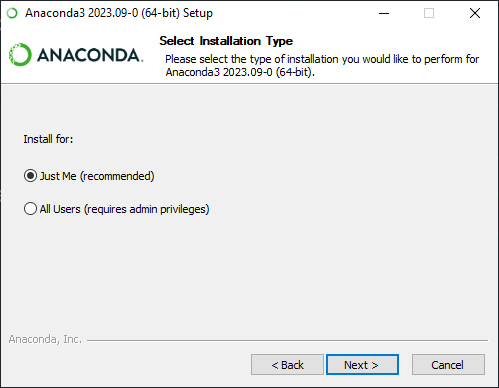
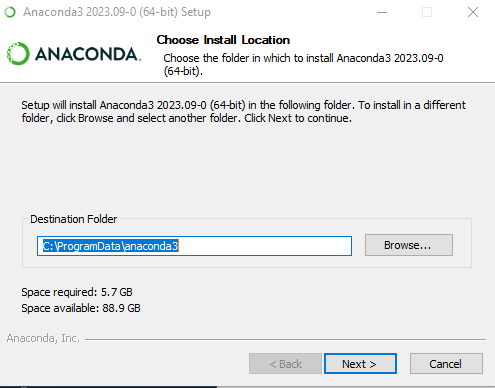
- Choose the installation location: the proposed location differs depending on your choice in the previous step. Usually the default proposed location is fine. Click Next.
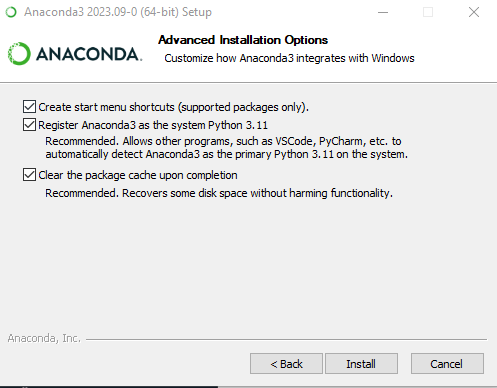
- Advanced Installation Options: choose which advanced options you want. We recommend to at least check the “Register Anaconda as the system Python” option, because that allows other programs to detect the Python installation on your machine.
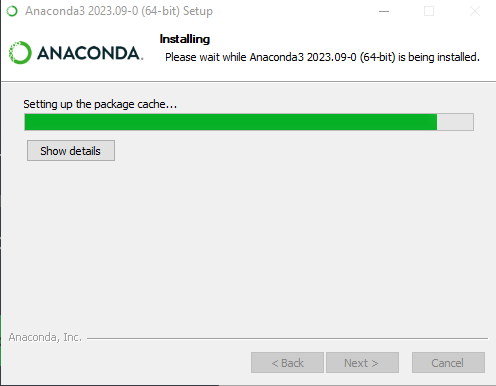
- Wait for installation. This can take up a couple of minutes, depending on whether you are installing just for you or for all users. Click Next once the installation has finished
- Click Next in the following screen that promotes Anaconda cloud notebooks.
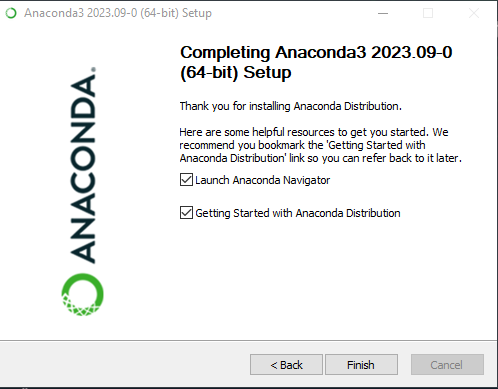
- Finally, indicate whether you want Anaconda to launch and whether you want to see the Getting Started with Anaconda Distribution, and click Finish.
- Welcome to Anaconda: click next
- Open https://www.anaconda.com/products/individual#download-section with your web browser.
- Download the Anaconda Installer with Python 3 for macOS (you can either use the Graphical or the Command Line Installer).
- Install Python 3 by running the Anaconda Installer using all of the defaults for installation.
Open https://www.anaconda.com/products/individual#download-section with your web browser.
Download the Anaconda Installer with Python 3 for Linux.
(The installation requires using the shell. If you aren’t comfortable doing the installation yourself stop here and come to the walk-in hours to ask for help.)Open a terminal window and navigate to the directory where the executable is downloaded (e.g.,
cd ~/Downloads).Type
bash Anaconda3-and then press Tab to autocomplete the full file name. The name of file you just downloaded should appear.
Press Enter (or Return depending on your keyboard). You will follow the text-only prompts. To move through the text, press Spacebar. Type
yesand press enter to approve the license. Press Enter (or Return) to approve the default location for the files. Typeyesand press Enter (or Return) to prepend Anaconda to yourPATH(this makes the Anaconda distribution the default Python).Close the terminal window.
Step 2: Obtain lesson materials
- Download the zip folder with all course materials (see Course Materials).
- Create a folder called
python-workshopon your Desktop (or any other place where you want to store the materials). - Move the downloaded zip to the folder where you want to store these course materials.
- Unzip the zip file.
In your python-workshop you will see a folders called data and the following files:
python-workshop
├── data
│   ├── species.csv
│   ├── surveys.csv
│   └── plots.csv
├── morning_exercises.ipynb
├── afternoon_exercises.ipynb
└── preparation.ipynb
Step 3: Start Jupyter interface and complete preparation.ipynb
To start working with Python, we need to launch a program that will interpret and execute our Python commands. Below we list several options. If you don’t have a preference, proceed with the top option in the list that is available on your machine. Otherwise, you may use any interface you like.
Option A: Jupyter Notebook
A Jupyter Notebook provides a browser-based interface for working with Python. If you installed Anaconda, you can launch a notebook in two ways:
- Launch Anaconda Navigator. It might ask you if you’d like to send anonymized usage information to Anaconda developers. Make your choice and click “Ok, and don’t show again” button.
- Find the “Notebook” tab and click on the “Launch” button. Anaconda will open a new browser window or tab with a Notebook Dashboard showing you the contents of your Home (or User) folder.
- Navigate to the
datadirectory by clicking on the directory names leading to it.Desktop,python-workshop, thendata: - Launch the notebook called
preparation.ipynbby clicking on it. - Follow the instructions in the notebook to finalize your preparation for the workshop. If the output of the last cell displays 4 version numbers and the words “No errors! Ready to code!” instead of an error message, your installation is successful. If not, contact us at RDM walk in hours or reply to the welcome email.
Navigate to the
python-workshopdirectory:
Unix shell
If you’re using a Unix shell application, such as Terminal app in macOS, Console or Terminal in Linux, or Git Bash on Windows, execute the following command:rzlfnm cd ~/Desktop/python-workshopCommand Prompt (Windows)
On Windows, you can use its native Command Prompt program. The easiest way to start it up is pressing Windows Logo Key+R, enteringcmd, and hitting Return. In the Command Prompt, use the following command to navigate to thedatafolder:usul cd /D %userprofile%\Desktop\python-workshopStart Jupyter server:
Unix shellrzlfnm jupyter notebookCommand Prompt (Windows)
usul python -m notebookLaunch the notebook called
preparation.ipynbvia the ‘File’ menu.Follow the instructions in the notebook to finalize your preparation for the workshop. If the output of the last cell displays 4 version numbers and the words “No errors! Ready to code!” instead of an error message, your installation is successful. If not, contact us at RDM walk in hours or reply to the welcome email.
Option B: IPython interpreter
IPython is an alternative solution situated somewhere in between the plain-vanilla Python interpreter and Jupyter Notebook. It provides an interactive command-line based interpreter with various convenience features and commands. You should have IPython on your system if you installed Anaconda.
To start using IPython, execute:
ipythonOption C: plain-vanilla Python interpreter
To launch a plain-vanilla Python interpreter, execute:
pythonIf you are using Git Bash on Windows, you have to call Python via winpty:
winpty pythonPython packages
This workshop will make use of the following Python packages:
pandasmatplotlibnumpy
Anaconda Navigator comes with these packages, so you are ready to go. If you are using another option to work with Python, you need to install these packages. We then assume that you know how to install packages, otherwise we recommend using Anaconda instead. If for some reason you cannot work with Anaconda and you need help with installing packages, we are happy to help during the RDM walk in hours, or email us by replying to the welcome email.
References
The instructions on this page were adapted from the setup instructions of the Software Carpentries “Programming with Python” course and their Workshop Template Python installation instructions, both released under the Creative Commons Attribution license. Changes to the material were made, and can be tracked in the Git repository associated with this course.